
Ever need a dessert that looks fancy but takes almost no effort? These No-Bake Oreo Pops are the answer. When you’re short on time, don’t want to turn on the oven, or need a kid-friendly treat that won’t stress you out, this recipe saves the day. The best part? They taste like rich Oreo truffles but are way more fun to eat.
I’ve made these No-Bake Oreo Pops for birthday parties, bake sales, and last-minute holiday trays, and they never last long. With just a few simple ingredients and no baking required, you’ll learn exactly how to make smooth Oreo centers, coat them perfectly, and decorate them like a pro. I’ll also share storage tips, easy flavor twists, and answers to the most common questions so your Oreo pops turn out perfect every time.
Why You’ll Love This Recipe
-
Big chocolate flavor with that classic Oreo cookie taste
-
No oven needed, perfect for warm days or busy schedules
-
Great for kids and parties—easy to decorate and fun to eat
-
Make-ahead friendly, ideal for events and holidays
-
Customizable with different coatings, toppings, and flavors
Ingredients & Prep
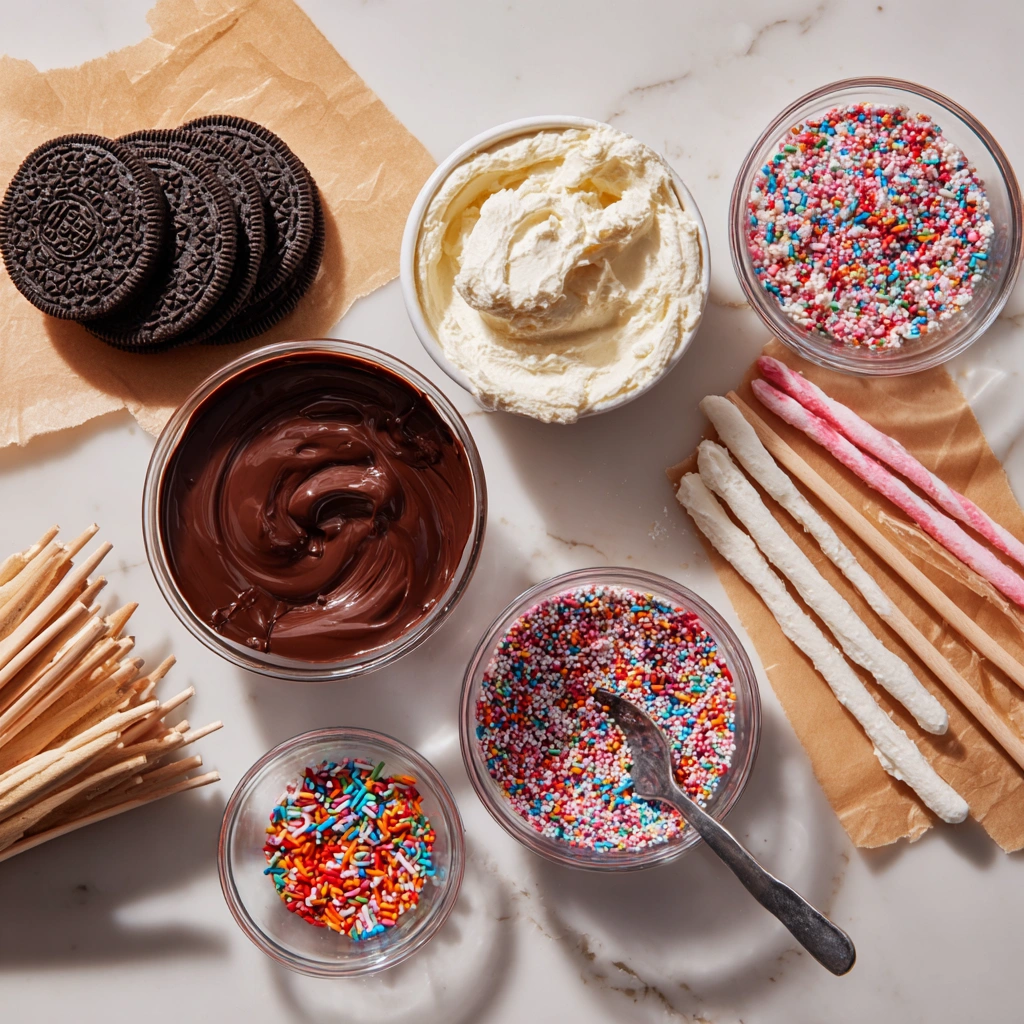
Main Ingredients Prep
-
Oreo cookies – Use classic Oreos for the best flavor. You’ll need about 36 cookies. No need to remove the filling.
-
Cream cheese – Full-fat cream cheese works best. Let it soften at room temperature for easy mixing.
Seasonings, Sauces, or Flavor Base
-
Vanilla extract (optional) – Adds a subtle bakery-style flavor to the Oreo mixture.
-
Salt (optional) – A tiny pinch helps balance the sweetness.
Pantry Staples
-
Candy melts or chocolate chips – White, milk, or dark chocolate all work well.
-
Lollipop sticks – Standard 6-inch sticks are perfect.
-
Sprinkles or toppings – Crushed Oreos, mini chocolate chips, nuts, or festive sprinkles.
Step-by-Step Cooking Instructions
Pre-Cooking Prep
Start by lining a baking sheet with parchment paper. This keeps the Oreo pops from sticking and makes cleanup easy.
Place the Oreo cookies into a food processor and pulse until they turn into fine crumbs. If you don’t have a food processor, seal the cookies in a zip-top bag and crush them with a rolling pin.
Transfer the crumbs to a mixing bowl. Add the softened cream cheese and vanilla extract if using. Mix until the mixture is smooth and holds together when pressed. It should feel like soft dough.
Cooking Method (No-Bake Assembly)
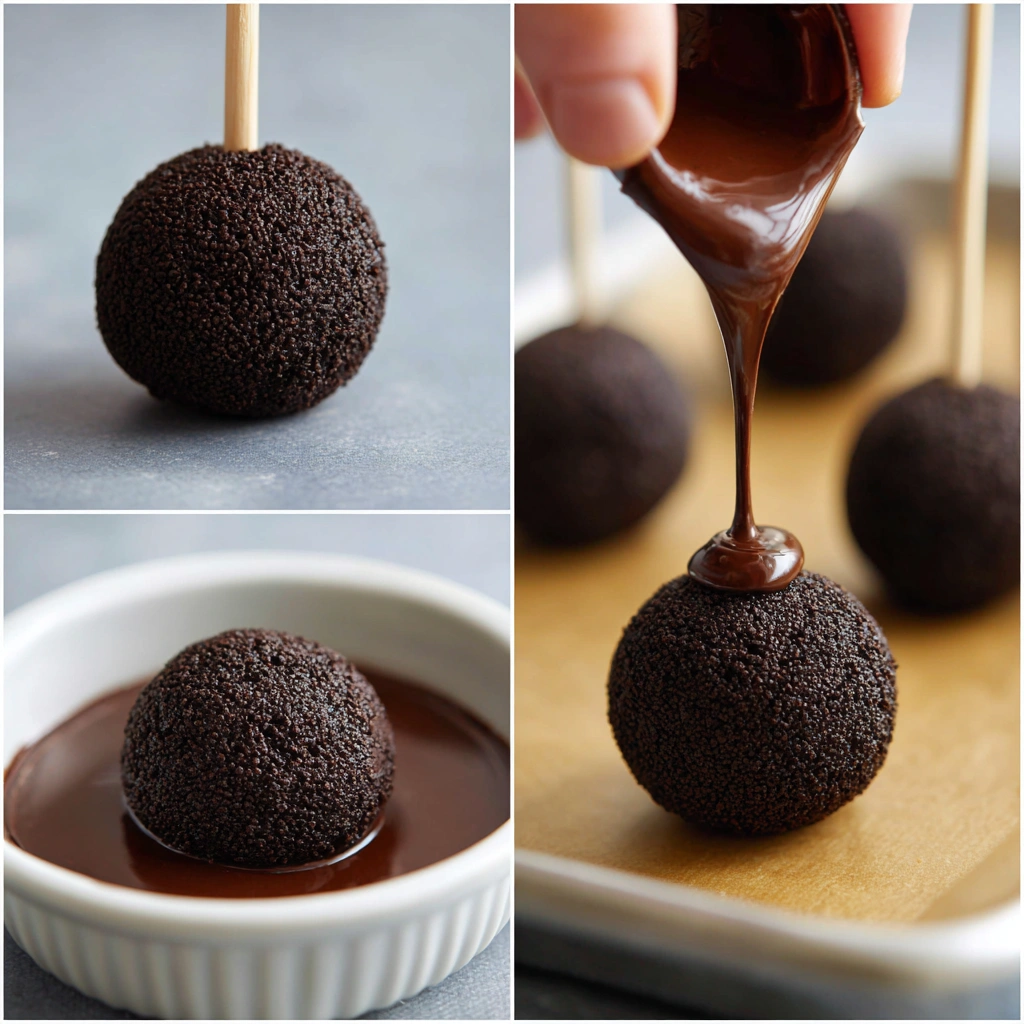
Scoop about one tablespoon of the Oreo mixture and roll it into a smooth ball. Place it on the prepared baking sheet. Repeat until all the mixture is used.
Insert a lollipop stick halfway into each Oreo ball. Once finished, place the tray in the freezer for 15–20 minutes. This helps the pops firm up and stay in place when dipping.
While the pops chill, melt the candy melts or chocolate according to package instructions. Use a microwave-safe bowl and stir every 20–30 seconds until smooth.
Doneness or Texture Check
Dip each chilled Oreo pop into the melted chocolate, gently tapping off the excess. The coating should be smooth and fully cover the Oreo center. If the chocolate seems too thick, add a teaspoon of coconut oil or shortening to thin it out.
Resting or Final Touches
Immediately add sprinkles or toppings before the coating sets. Stand the pops upright in a foam block or place them back on the parchment paper to set completely. Let them harden at room temperature or refrigerate for faster results.
Pro Tips for Perfect Results
Common Mistakes to Avoid
-
Skipping the chill step – Warm Oreo balls can fall apart when dipped.
-
Overheating chocolate – This can cause it to seize and become grainy.
-
Using low-fat cream cheese – It won’t bind the crumbs as well.
Recommended Tools
-
Food processor or blender
-
Silicone spatula
-
Microwave-safe bowl
-
Parchment paper
-
Foam block or tall cup for standing pops
Storage & Reheating Tips
Store No-Bake Oreo Pops in an airtight container in the refrigerator for up to 5 days. For longer storage, freeze them for up to 2 months. Thaw in the fridge before serving. These pops do not need reheating.
Flavor Variations
Spicy Version
Add a tiny pinch of cayenne pepper to the chocolate coating for a subtle spicy-sweet kick. It’s unexpected and delicious.
Healthy / Special Diet Option
For a lighter version, use reduced-sugar chocolate and dairy-free cream cheese. Gluten-free sandwich cookies also work well for gluten-free Oreo pops.
Global Flavor Twist
-
Mexican-style: Add cinnamon to the Oreo mixture
-
Italian-inspired: Mix in a splash of espresso
-
Holiday twist: Use peppermint extract and crushed candy canes
Serving Suggestions
Serve No-Bake Oreo Pops on a dessert platter with:
-
Fresh strawberries or raspberries
-
A drizzle of extra melted chocolate
-
Vanilla or cookies-and-cream milkshakes
-
Hot chocolate or cold brew coffee
They’re perfect for birthday parties, baby showers, holidays, and school events.
FAQs
Can I make this ahead of time?
Yes. No-Bake Oreo Pops are perfect for making ahead. Prepare them up to 3 days in advance and store them in the fridge until ready to serve.
How do I fix common mistakes?
If the mixture is too soft, chill it longer. If chocolate cracks, the pops may be too cold—let them sit at room temperature for a few minutes before dipping.
Conclusion
These No-Bake Oreo Pops prove that an impressive dessert doesn’t have to be complicated. With simple ingredients, no oven, and endless decorating options, this recipe is one you’ll come back to again and again. Readers tell me this is one of their most-requested party treats, and once you try it, you’ll see why.
If you loved this recipe, you’ll also enjoy my classic Oreo truffles or chocolate-dipped pretzel rods for another easy no-bake dessert. Give these Oreo pops a try, and don’t forget to share how you decorated yours!

No-Bake Oreo Pops
Ingredients
- Main Ingredients
- 36 Oreo cookies classic, filling included
- 8 oz full-fat cream cheese softened
- Flavor Base Optional
- 1 tsp vanilla extract
- Pinch of salt
- Pantry & Decorating
- 12 –16 oz candy melts or chocolate chips white, milk, or dark
- 24 –30 lollipop sticks 6-inch
- Sprinkles or toppings crushed Oreos, nuts, mini chips, festive sprinkles
Instructions
- Prep
- Line a baking sheet with parchment paper.
- Crush Oreos in a food processor until fine crumbs form (or use a zip-top bag and rolling pin).
- In a bowl, mix Oreo crumbs with cream cheese, vanilla, and salt until smooth and dough-like.
- Assemble (No-Bake)
- Scoop about 1 tablespoon of mixture and roll into smooth balls. Place on the baking sheet.
- Insert a lollipop stick halfway into each ball.
- Freeze for 15–20 minutes until firm.
- Coat & Finish
- Melt candy melts or chocolate in a microwave-safe bowl, stirring every 20–30 seconds until smooth.
- Dip each chilled pop into chocolate, tapping off excess.
- Immediately add toppings before the coating sets.
- Stand upright in a foam block or return to parchment to set completely.
Notes
- If chocolate is too thick, stir in 1 tsp coconut oil or shortening.
- Let pops sit 2–3 minutes at room temperature if cracking occurs (they may be too cold).
- Full-fat cream cheese gives the best texture and binding.